“Alexa, Turn On My Computer.”
A year or two ago, I bought myself an Amazon Echo. I was curious as to what the device could do, and it was on sale at the time. The fact that I’ve had a facination in smart home technology since high school also played a role in that purchase. Since then, it has hung out in a corner of my apartment, telling me the weather and playing music when I ask it to. As for automation, though, I didn’t really like the offerings at the time. It’s kind of a waste of the Echo’s abilities not to have any automation, though, and so, in true tinkerer style, I decided to make my own Alexa-controllable device.
This project’s based upon the work of Instructable user PatrickD126, and his instructable “Control Raspberry Pi GPIO With Amazon Echo and Python.” Thank you, PatrickD126.
The Idea
I get up in the morning on the weekend, shuffle over to the computer, push the power button, and wait. Wouldn’t it be better if I arrived at my desk just as the computer was finishing booting up? Wouldn’t it be neat to be able to ask my Echo to turn on my computer for me?
Should be simple enough. Using PatrickD’s instructable as a basis, create the hardware and software necessary for a Raspberry PI to momentarily switch a relay in response to a vocal command given to an Alexa-enabled device.
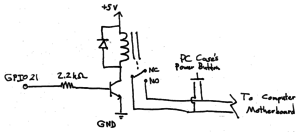
The HardwareThe heart of the project is a Raspberry PI 2 that I purchased some time back and never quite found a project for (better late than never). Tied to GPIO21 is a simple circuit consisting of a resistor, a transistor, a diode, and a relay, such that when the pin goes high, the relay closes. The relay is connected in parallel with the power button on my computer, so that either the relay or the button can be used to start it.
The Software
Running on the Raspberry Pi is a simple Python program based on a package called Flask-Ask, developed by a software engineer by the name of John Wheeler. This program, with the aid of a matching Alexa skill I named Management, evaluates the words the Alexa server sends its way and matches them to an action. Specifically, when it hears the words “computer” and “on,” it drives GPIO21 high for half a second and asks Alexa to respond to the voice command with “turning on computer.”
#management.py

from flask import Flask

from flask_ask import Ask, statement, convert_errors

import RPi.GPIO as GPIO

import logging

import time
GPIO.setmode(GPIO.BCM) #sets up script to address GPIO by GPIO pin names, not absolute position
GPIO.setup(21, GPIO.OUT) #sets pin 21 to an output; will be used to drive relay high to turn on computer
app = Flask(__name__)
ask = Ask(app, '/')
logging.getLogger("flask_ask").setLevel(logging.DEBUG)
@ask.intent('DeviceControlIntent', mapping={'status': 'status', 'device': 'device'})
def device_control(status, device):
if device in ['computer']: #user asks to control computer
if status in ['on', 'high']: #user asks to turn on computer
GPIO.output(21, GPIO.HIGH)
time.sleep(0.5)
GPIO.output(21, GPIO.LOW)
return statement('Turning on computer')
if status in ['off', 'low']: #user asks to turn off computer
return statement('Sorry. That function is unavailable')
else: #user asks to control a device not added to the if tree
return statement('Sorry. I cant seem to find that device')
if __name__ == '__main__':
port = 5000 #the custom port you want
app.run(host='0.0.0.0', port=port)
The First Run
Where To Go From Here
I’m not quite ready to button the Pi inside my computer permanently. I’d like to get my solderless breadboard back. More importantly, there are a couple more features I’d like to add before I call this one done.
1. Clean up the code. Turn instances of pin 21 in the code into a variable that’s set on start, etc, so that the code is easier to read, understand, and modify.
2. Tie one of the Pi’s pins to the 5V USB line of the computer, and add a check to the Management program. If the pin is high and the user asks to turn on the computer, Alexa responds with “the computer is already on” and the relay is not actuated.
3. Add a small microcontroller that can emulate a USB keyboard, and some more code so that the user can ask Alexa to lock the computer. The Pi can set a pin high, the microcontroller sees the pin go high, and Windows+L is typed by the microcontroller, locking the computer.
4. Use that same microcontroller to actuate a key macro that shuts down the computer when Alexa is asked to do so.
Beyond that, the Management program and Alexa skill will be the basis for a number of other automated devices and operations I have in mind. For instance, Management could be used to communicate with ethernet shield-equipped Arduinos in my apartment, reading off temperatures when asked, or actuating relays to turn on and off appliances (mostly lights). Hence why I decided to call it Management: in the future, it will manage my home.
The parts for the next phase of the project (some USB cables and an Adafruit Trinket) have already arrived. Stay tuned as Management gets smarter and more feature filled.
13
